cp_log_exporter

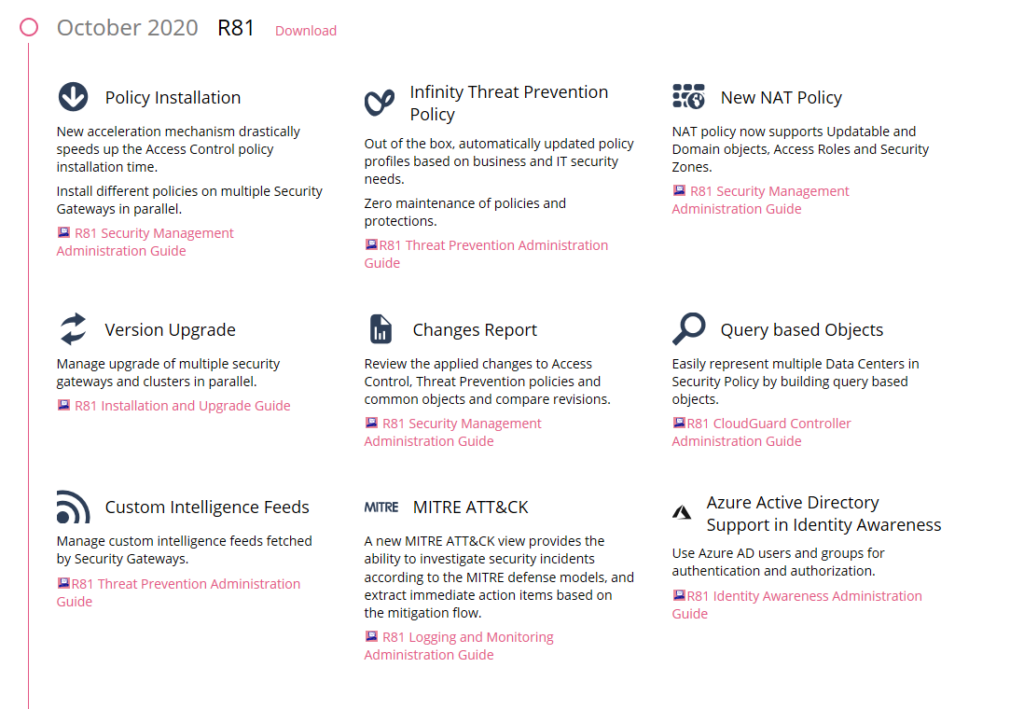
Checkpoint have made a tool to forward checkpoint logs to SIEM systems.
It is possible to filter specific logentries out from being forwarded to the siem system using this tool, but it depends on what format you are using.
I currently work with LogRhythm SIEM systems, and here it is possible (with great granularity) to specify which log entries is being sent.

For more info see Checkpoint sk122323

First we will configure the log exporter to forward logs to our SIEM system.
Log in to your Checkpoint Manager or Log Server in Expert mode.

[Expert@GW1:0]# cp_log_export add name TEST target-server 192.168.1.3 target-port 514 protocol tcp format logrhythm read-mode semi-unified
Export settings for TEST has been added successfully
To apply the changes run: cp_log_export restart name TEST
[Expert@GW1:0]#
[Expert@GW1:0]#cp_log_export restart name TEST

Stopping log_exporter for: TEST
Starting log_exporter for: TEST
cpwd_admin:
Process EXPORTER.TEST started successfully (pid=29053)

Just to be sure – run this command. Sometimes the exporter starts successfully, but do not show that it stops again.
[Expert@GW1:0]# cp_log_export status

name: TEST
status: Running (29053)
last log read at: 7 Apr 20:46:52
debug file: /opt/CPrt-R81/log_exporter/targets/TEST/log/log_indexer.elg

Now the log exporter is running and you should see logs streaming in on your SIEM system.
So lets proceed to the second part, filtering in the logentries we want to forward to our SIEM system.
We need to edit two files in order to do this…

[Expert@GW1:0]#cd $EXPORTERDIR/targets/TEST/
[Expert@GW1:0]# ls
conf data fieldsMapping.xml log log_exporter log_indexer_custom_settings.conf targetConfiguration.xml tmp
[Expert@GW1:0]#vi targetConfiguration.xml (We will in this file point to a configuration file in the conf directory)


Change the configuration to this…


From:<mappingConfiguration></mappingConfiguration>
To:<mappingConfiguration>conf/LogRhythmFieldMapping.xml</mappingConfiguration>
From: <exportAllFields>true</exportAllFields>
To:<exportAllFields>false</exportAllFields>

Save and exit. (If you have trouble saving lookup vi or vim editor for basics)


Now we will edit the second file “LogRhythmFieldsMapping.xml” in the conf directory
[Expert@GW1:0]#cd conf
[Expert@GW1:0]# ls

Bookmarks.xml FilterConfiguration.xml JsonFieldsMapping.xml LeefFieldsMapping.xml LogFields.xml SplunkFieldsMapping.xml _local_ckp.linux50.tmp filter_tree.xml log_indexer_settings.conf tmp_FastEvent_log_fields.C
CefFieldsMapping.xml GenericFieldsMapping.xml JsonFormatDefinition.xml LeefFormatDefinition.xml LogRhythmFieldsMapping.xml SplunkFormatDefinition.xml fields-enums.xml ip2country.csv smartlog_unification_scheme.C
CefFormatDefinition.xml GenericFormatDefinition.xml LaaSFieldsMapping.xml LogFamilyFields.xml LogRhythmFormatDefinition.xml SyslogFormatDefinition.xml fieldsMapping.xml log_fields.C targetConfigurationSample.xml
[Expert@GW1:0]#
[Expert@GW1:0]#vi LogRhythmFieldsMapping.xml

Edit the LogRhythmFieldMapping.xml to the support your needs.
The default setting is “true” which means that the field is sent in the log file.
Changing this to “false” will exclude the log entry from being forwarded to the remote syslogserver.

Example – exclude the “user” field in the logentry from being forwarded to the remote syslogserver.
The original entry looks like this.:

<field>
<exported>true</exported>
<origName>user</origName>
<dstName>User</dstName>
</field>


Change the “true” to “false” so the entry looks like this.

<field>
<exported>false</exported>
<origName>user</origName>
<dstName>User</dstName>
</field>


After we are done editing our “target” configurations, we need to restart the log exporter tool.

[Expert@GW1:0]# cp_log_export restart
Stopping log_exporter for: TEST
cpwd_admin:
Process EXPORTER.TEST (pid=29053) stopped with command “kill 29053”. Exit code 0.
Starting log_exporter for: TEST
cpwd_admin:
Process EXPORTER.TEST started successfully (pid=894)


[Expert@GW1:0]# cp_log_export status

name: TEST
status: Running (894)
last log read at: 7 Apr 21:09:24
debug file: /opt/CPrt-R81/log_exporter/targets/TEST/log/log_indexer.elg

[Expert@GW1:0]#


Now the “user” field is not being forwarded to your SIEM system.
(But it is – i can see two more entries with the user field !)

Well… thats because there is three fields in the LogRhythmFieldMapping.xml file containing a “user” field… edit them all out, then everything will work as expected 🙂

So to summon things up…
1. configure the cp_log_exporter
2. Edit the targetConfiguration.xml file
3. Edit the LogRhythmFieldMapping.xml file
4. Restart the exporter tool.

A big Thanks goes to Alon from Checkpoint, for explaining to me how this feature worked !

FW monitor – the new way.

The other day i was performing troubleshooting on a firewall, and wanted to make a capture using fw monitor.

As i normally do, i performed the commands mentioned in sk30583 with the ”-e” flag, but the other day i got an error.

Then i remembered… going forward from R80.x they made some new commands.

I don´t really know when or why this only impacts some of the R80 systems, (and i have not spend time researching this topic) but my guess is that it is dependant on the patchlevel of the system.

Anyway – the new commands can also be found at checkpoint Sk30583.

Go to chapter 8 ”Capture Examples of “-F” flag”

Example.

(Remove the brackets from the command)

fw monitor -F ”{src IP}, {src port}, {dst IP}, {dst port}, {protocol number}”:

Example captureing ssl trafic on port 443.

fw monitor -F ”0, 0, 0, 443, 0”

Example capturing traffic from source ip

fw monitor -F ”10.10.10.10, 0, 0, 0, 0”

For more fw monitor

R81 is out in Early Availability

It looks like Checkpoints R81 is comming soon. It is now available in the Public Early Availability program.

This means that if you have a Checkpoint subscription, you can now participate in EA, and download the EA release.

And there is a lot of changes, but here is a few…

  • Custom intelligence feeds can now be managed through SmartConsole. Add, delete or modify feeds fetched by the Security Gateways as well as import files in a CSV or STIX 1.x formats.
  • Out of the box policy profiles based on business and IT security needs.
  • Azure Active Directory support in Identity Awareness – Use Azure AD users and groups for authentication and authorization using Identity Awareness Access Role picker.
  • Hit count for NAT rules.
  • Cross-Domain Management Server Search lets you search for objects across multiple Domain Management Server databases.

And much more…

The Checkmates forum have the improvements listed.

https://community.checkpoint.com/t5/Product-Announcements/R81-EA-Program-Production/ba-p/86945

Troubleshooting with fw monitor

This is probably the command i use the most when troubleshooting traffic issues.
The reason is that we can follow packets flow through the kernel / firewall engine, and see if it leaves the interface.
There are 4 inspection points when a package passes through a Security Gateway. (See the picture)
You need to be in expert mode to use the “fw monitor” command.

[Expert@GW1:0]# fw monitor -e “accept host(8.8.8.8);”
monitor: getting filter (from command line)
monitor: compiling
monitorfilter:
Compiled OK.
monitor: loading
monitor: monitoring (control-C to stop)
[vs_0][fw_1] Mgmt:i[66]: 192.168.11.197 -> 8.8.8.8 (UDP) len=66 id=10534
UDP: 57317 -> 53
[vs_0][fw_1] Mgmt:I[66]: 192.168.11.197 -> 8.8.8.8 (UDP) len=66 id=10534
UDP: 57317 -> 53
[vs_0][fw_1] eth1:o[66]: 192.168.11.197 -> 8.8.8.8 (UDP) len=66 id=10534
UDP: 57317 -> 53
[vs_0][fw_1] eth1:O[66]: 192.168.11.197 -> 8.8.8.8 (UDP) len=66 id=10534
UDP: 57317 -> 53
[vs_0][fw_0] Mgmt:i[62]: 192.168.11.196 -> 8.8.8.8 (UDP) len=62 id=47650
UDP: 58094 -> 53
[vs_0][fw_0] Mgmt:i[65]: 192.168.11.196 -> 8.8.8.8 (UDP) len=65 id=0
UDP: 55619 -> 53


You can also use source or / and destination

[Expert@GW1:0]# fw monitor -e “accept src=192.168.11.1 and dst=8.8.8.8;”

So how does this help me prove that the firewall is not the problem ???
Lets take a look at how the packet is passing through the firewal virtual machine.

The shown interfaces are just examples for simplification, just as the return traffic would be the opposite regarding to the iIoO flow.

So if you see all 4 types “i I o O” its safe to say that the package have left your firewall.

Using the new fw monitor

Change keyboard layout

When working with Checkpoint from console, or VMware Workstation, you might want to change the keyboard layout, to your native settings.

This is how its is done.

Go to expert mode.

———————————-  

CP1> expert
Enter expert password: ***********

Warning! All configuration should be done through clish
You are in expert mode now.

[Expert@HostName]# dbset keyboard:mapping desired_keyboard_layout_name

[Expert@HostName]# dbset :save

[Expert@HostName]# /bin/kbd_map_xlate keyboard:mapping < /config/db/initial

Reboot your system to make the changes go into effect.

This is the currently supported keyboard layouts.

keyboard layout

For full description see sk73420

https://www.checkpoint.com/

Save your gaia configuration to a file

Lets talk basic configuration.
Checkpoint Gaia have brought a lot of cool features, which we use on a daily basis.
One of my favorites is the posibillity to perform easy deployment and backup of the configurations.
Checkpoint have over time worked with several different type of ways to perform backup, snapshots and others… (leaving the Management server out of this)

The one i use the most, is backing up the gaia configuration… why you may ask ?
Because it works every time.
True, it does not get all the Checkpoint relevant files on the Security Gateway, but it saves me time when i need to configure and deploy a fresh Checkpoint Security Gateway.
The Gaia cli offers the commands to configure the system.
We will take a look at how we can save the configuration to a file.


(To have Checkpoint save your configuration changes to the system, you need to perform “save config” form clish…  notice that this is not the same as the “save configuration” command mentioned in this article.
Save config = save your changes to the database
Save configuration = save your configuration to a file)


We will be working in two modes.
Clish (left) and Expert (bash – right).

Save your gaia configuration
Expert mode
Save your gaia configuration
Gaia Clish


when you login at your Security Gateway you will be met with one of these two prompts.
This is the clish prompt, and “gw2” is the hostname of my gateway.
gw2>
To get to Expert from cli, type “Expert

This is as the name states, the Expert mode, and gaia cli commands does not work here..
(well you can make them work, but that is out of this scope)

[Expert@gw2:0]#
To get to cli from Expert, type “clish

—————————–
To create a backup of your gaia configuration, you need to be in clish mode.
Perform the commands shown below, and you will create the backupfile “nameyourfile”
gw2>
gw2> save configuration nameyourfile

You may want to see whats inside the file, but remember that clish does not support native linux commands like ls or cat.
To view your backupfile, you need to get into expert mode.
gw2> expert
Enter expert password: (Entering my very secret password here)

ls to see the files in your home directory.
[Expert@gw2:0]# ls
ftw.txt nameyourfile
[Expert@gw2:0]# cat nameyourfile
This will show the Checkpoint Gaia configuration, and you can edit the file if you want to change something. If you want to perform a clean installation of a Security Gateway, you can modify and use this file to configure the settings on the gateway.

Now copy this file to usb or off the Checkpoint box and save it for later use.

For more info see Secure Knowledge article: sk91400

https://www.checkpoint.com/

SSH login delay

You may expirence a ssh login dealy, between entering your username and the password prompt.

ssh delay during login
ssh login delay – Click on image to play

The cause of the delay, is when SSHD service performs reverse DNS lookup to the client’s ip address.

You can disable this feature in /etc/ssh/sshd_config
Start by makeing a backup of the file.
[Expert@gw2:0]# cp -v /etc/ssh/sshd_config /etc/ssh/sshd_config_ORIGINAL

Now edit the file with vim.
[Expert@HostName]# vi /etc/ssh/sshd_config

Search for this line “#UseDNS yes”
Push Insert button and add “UseDNS no” on the line below

The file should now look like this.
#ShowPatchLevel no
#UseDNS yes
UseDNS no
#PidFile /var/run/sshd.pid
MaxStartups 10:30:100

To quit and save your settings do the following.
1. Esc
2. Shift + Q
3. wq! + Enter  (w for write q for quit)

Now you should be out of vim, and can restart the service with the command below.
[Expert@gw2:0]# service sshd restart
Stopping sshd: [ OK ]
Starting sshd: [ OK ]
[Expert@gw2:0]#

Now you whould no longer have SSH login delay. 🙂

For more info see Secure Knowledge article sk106497

Delay between user name and password prompts when log in to the gateway via SSH

https://www.checkpoint.com/

Load configuration backup

One of the things i find particular anoying, is when a gaia config backup does not load correct.

On a R77.x system you can backup the configuraiton with “save configuration filename.txt” but after you have performed a clean install of your gateway to R80.x, the configuration stops at line 41, 75, or somthing else…

I HATE it…         The solution is actually simple…. RTFM. (I did today….)

when you log in to your clean installed system, you can manipulate how the clish handles errors.

————————–

gw2> set clienv (push tab)
config-lock – Set Default Config-lock flag.
debug – Set Debug Level.
echo-cmd – Set echo-cmd flag
on-failure – Set on-failure action
output – Set Output mode.
prompt – Set the command prompt.
rows – Set Screen Rows.
syntax-check – Set syntax-check mode.
gw2> set clienv on-failure continue

————————–

If you want, you can save this setting…  I chose not to, as i bet i will forget this is set, when i one day is performing some task, that i really want to stop if there is an error.

Backing up Gaia system level configuration:  sk102234

https://www.checkpoint.com/

Change your clish to bash – from cli

A while ago i posted “Change clish to bash – and back”  but do you know that you can actually do it from clish ?

When creating new users, you can set their enviroment to bash by default.

——————————– 

gw2> set user USERNAME shell /bin/bash 

gw2>save config

Change your clish


——————————– 
Next time you log in, you will be at bash prompt.

https://www.checkpoint.com/